Callusing is the formation of a dry, scab-like seal over the cut surface of a propagated stem or leaf. Without it, the wound bleeds water for days and admits soil-borne water moulds; with it, the cutting is sealed against pathogens and ready to root. Estimates from amateur and small-nursery records put failure rates without proper callusing at 30 to 40% across mixed succulent batches, and the failure mode is almost always the same: blackening at the base within the first ten days after potting. Here is the rest of the picture.
Quick Answer
- Let cuttings dry 5-10 days after cutting (soft stems) or 10-14 days (woody stems) before potting.
- A proper callus is dry, matte, and firm - not wet, glossy, or soft.
- Skip callusing for leaf pulls - they callus naturally as they dry on the surface.
Part of the Beginner's Guide to Succulents.
What callusing is biologically
A cut succulent is an open wound. The exposed parenchyma cells (the thin-walled storage tissue that gives a leaf or stem its plumpness) lose water immediately and remain biologically vulnerable until the plant builds a new outer barrier. Callusing is that barrier-building process.
Two compounds carry most of the work. Suberin is a waxy, water-impermeable polymer deposited in the cell walls of the parenchyma layer immediately below the cut. It is the same material that makes cork bark resistant to water and gas exchange, and it is what eventually turns a cut surface from glossy and wet to matte and dry. Lignin is laid down alongside suberin and gives the new barrier mechanical rigidity, which is why a properly callused base feels firm rather than papery.
The timeline at the cellular level is consistent. Suberin synthesis begins within 24 to 72 hours of injury at room temperature. The visible scab forms over 5 to 10 days, depending on tissue thickness. Once that barrier is intact, the cutting is sealed against opportunistic fungi and the Pythium and Phytophthora water moulds that cause the rapid base rot beginners often attribute to "bad soil".
Why succulents need it more than most plants
A herbaceous cutting from a tomato or coleus loses some sap, then dries within hours and is ready for substrate the same day. A succulent cutting does not behave like that. The whole point of succulent tissue is high-volume water storage, with parenchyma making up 70% or more of leaf and stem mass in many Echeveria (DC.) Lem., Sedum L., and Crassula L. species. A cut into that tissue is a cut into a reservoir.
Three consequences follow. First, a freshly cut succulent surface continues to weep cell sap for hours to days, far longer than a thinner-stemmed plant would. Second, that wet surface is an open invitation to Pythium, Fusarium, and the bacterial soft rot organisms that thrive on hydrated wound tissue. Third, the carbohydrate concentration in succulent sap (a residue of CAM photosynthesis and stored osmotica) is high enough to feed those pathogens directly. Skip callusing and a 1 cm wound becomes a feed station that runs for a week.
This is also why standard rooting techniques from herbaceous propagation transfer poorly. Misting, rooting hormone applied to a fresh cut, and humidity domes all reduce time to root for a tomato or fuchsia. Used on a succulent cutting, the same techniques make rot more likely than rooting.
How long is enough
Callusing time scales with cut surface area and tissue water content, not with calendar urgency. The right window for a given cutting depends on what you took.
| Cutting type | Callus time | Notes |
|---|---|---|
| Thin leaves (soft Sedum, soft Echeveria) | 1 to 2 days | Small wound surface, low sap volume |
| Thick leaves (Echeveria agavoides, Pachyphytum oviferum, Sedum nussbaumerianum) | 3 to 4 days | Glaucous bloom slows visual drying |
| Soft stem cuttings (Crassula, Aeonium tip cuttings) | 5 to 7 days | Hollow or pithy stems need the upper end of this range |
| Woody cactus cuttings (Opuntia pads, slim columnars) | 10 to 14 days | The thicker pad needs the longer window even when the cut feels dry |
| Large cactus pieces (substantial columnars, large Cereus sections) | 21 to 30 days | Anything over 5 cm in diameter |
Two practical rules cover almost every case. If you can still see a glossy or wet sheen anywhere on the cut, the cutting is not callused. And if the wound feels cool and slightly damp to the back of a finger after the published window, give it another two or three days before potting. The cost of a few extra days is nothing; the cost of potting too early is the cutting itself.
Conditions during callusing
Callus formation is a metabolic process, and the plant has preferences. Get any one of four variables wrong and the seal forms slowly or unevenly.
Temperature: 18 to 22 °C (64 to 72 °F). Cooler than 15 °C and suberin deposition stalls. Warmer than 27 °C and the cut surface dries so quickly that the parenchyma cells crack rather than seal smoothly, leaving microscopic openings that pathogens still find.
Relative humidity: 30 to 50%. Most temperate indoor air during heating season sits in this range without effort. In a humid kitchen or greenhouse, callusing slows and rot risk rises. A room with a fan running in the background is fine; a sealed humidity dome or a closed propagator is not.
Light: bright but indirect. Direct sun on a fresh wound dries it too aggressively and sun-scalds adjacent tissue. A north-facing windowsill, an open shelf 2 m back from a south window, or a position under a grow light at low intensity all work.
No substrate contact. This is the most often skipped condition. The cutting belongs on a paper towel, an open mesh seedling tray, a dry plate, or a perlite-filled tray with the base resting on the surface only. Set it in damp pumice or potting mix during callusing and you defeat the entire process: the wound never sees dry air, suberin synthesis stalls, and the supposed callus underneath is wet tissue waiting to rot.
For best results, lay leaves flat with the petiole base barely clear of the surface, and stand stem cuttings upright in an empty pot or against a short bamboo stake. The aim is air on every side of the wound for the full callus window.
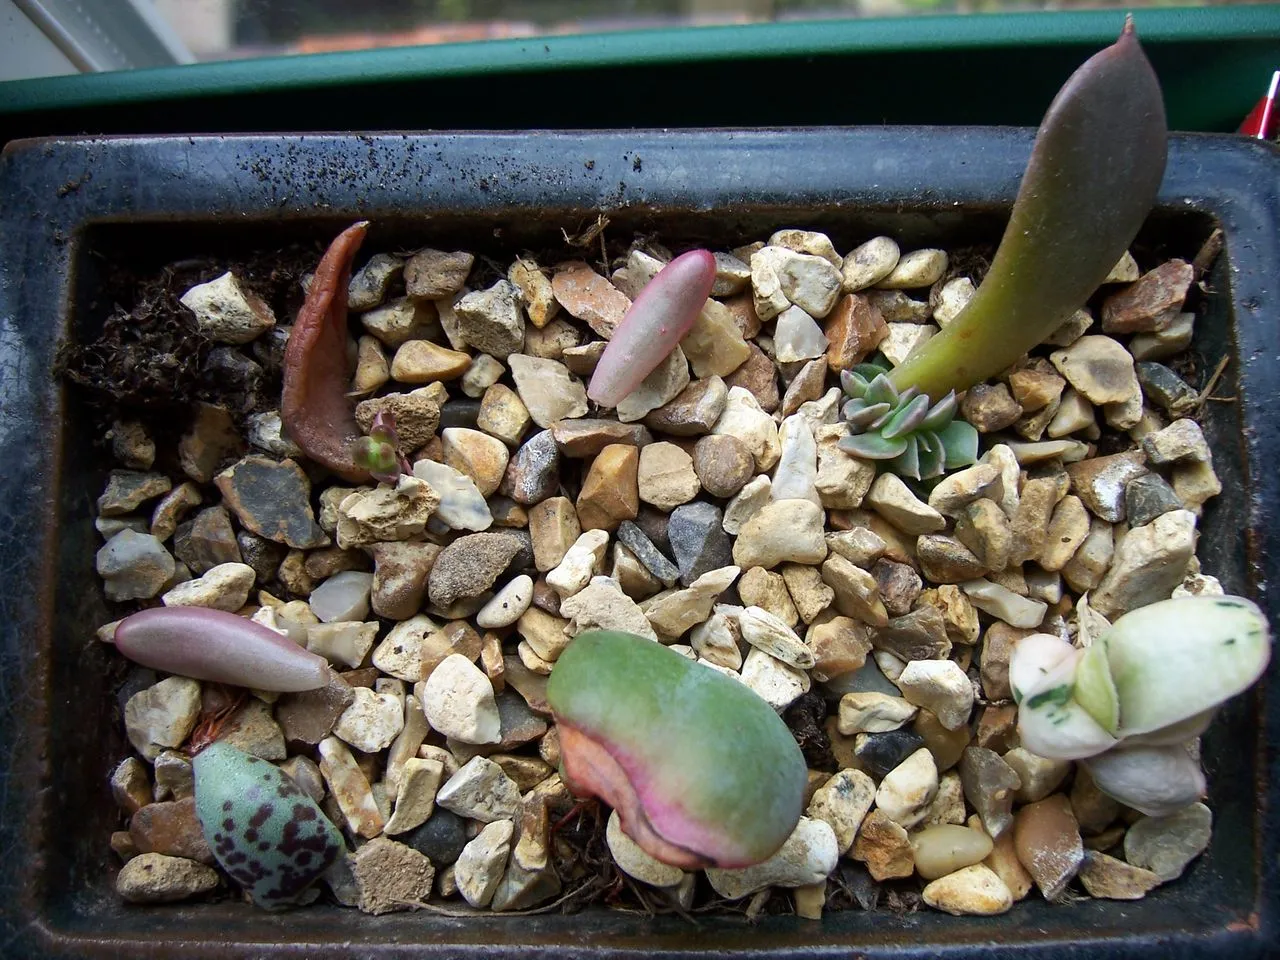
Visual signs of a properly-formed callus
Inspecting cuttings every day or two during callusing is worth doing, because trouble is much easier to handle on day three than on day seven.
- Day 1. The cut surface is glossy, wet, and the same colour as the surrounding tissue.
- Day 2 to 3. The sheen disappears. The surface should look matte, not shiny, and feel dry to a fingernail tip. If it still glistens at this point, the room is too humid or too cold, or the cutting was very thick.
- Day 5 to 7. A slight ring forms around the perimeter as the cells inside the wound deposit suberin and contract. The cut surface itself sits very slightly inset relative to the surrounding tissue, like a shallow scab.
- Day 7 to 10. The colour of the scab is informative. White, pale grey, or warm tan indicates a clean callus; a thin pinkish flush on a freshly cut Sedum rubrotinctum R.T.Clausen is also normal. Black, dark brown, or any soft, sunken tissue signals bacterial soft rot, and the cutting should be discarded or recut at least 1 cm above the affected zone and callused again.
A correctly callused base also sounds different. Tap a pen lightly against the cut: a sealed callus gives a faint dull tap, while a still-wet wound gives almost no sound at all because of cushioning sap.
When skipping callus is OK
There is one credible exception worth knowing, sometimes called the Mexican-grower technique by collectors who learned it from nurseries in Puebla and surrounding states. For Echeveria and soft Sedum stem cuttings you can take the cutting and place it directly on bone-dry pumice or a coarse pumice and grit blend, with no callus rest on a paper towel, provided that:
- the substrate is genuinely dry to its full depth, not "drying out",
- the substrate stays dry for at least seven days after the cutting goes in,
- ambient temperature stays in the 18 to 24 °C range,
- and humidity stays below about 50%.
Under those conditions the cut surface callusses on the substrate rather than on a paper towel, and roots emerge from the callused base directly into the dry pumice. The technique works because the pumice provides air rather than moisture during the critical window.
It does not work for cactus cuttings (the surface area is too large to seal cleanly while in contact with substrate), for woody Crassula (too much sap volume), or for any cutting going into damp, organic, or recently watered mix. Treat the technique as the deliberate exception, not the default. Never skip the callus phase for a cutting destined for moist substrate.
Common mistakes
A short list covers the failures that account for most lost cuttings.
- Rooting hormone on a wet cut. The powder rinses off the wet sap and provides no benefit. Powdered IBA hormones bind to a callused, dry surface and only then influence root initiation. Apply hormone, if at all, after callusing, not before.
- Wrapping cuttings in foil, plastic, or cling film. The wrap traps respired water vapour against the wound and creates an anaerobic, condensation-rich pocket. Anaerobic bacterial rot follows within a few days.
- Setting cuttings on a damp paper towel. A scab still forms on the upper side of the leaf or stem, but the underside in contact with the towel rots underneath the apparent callus. The visible top hides the failure until potting day.
- Sealed jars and humidity domes. Both keep humidity at 80 to 100%. The cut surface stays glossy and wet for days, suberin synthesis stalls, and the cutting often softens before any callus appears.
- Potting on the strength of a "dry-looking" surface after one day. A 24 hour rest is enough only for the thinnest Sedum leaves. Match the time to the tissue, not to your impatience.
- Repeated handling during callusing. Every time you pick up a cutting and squeeze the base to check firmness, you reopen the perimeter and reset the clock. Look, do not poke.
Most lost cuttings are lost in the callusing window or the first week after potting. Get this stage right and the rest of propagation is far less precarious.
See also
- A Beginner's Guide to Succulents: the surrounding decisions about light, water, and substrate that determine whether a callused cutting roots or rots
- Stem Cuttings: Reliable Propagation for Soft and Woody Stems: where callusing fits in the full stem cutting workflow, with timings by genus
- Leaf Propagation: Step-by-Step for Crassulaceae: callus timing for thinner leaf tissue and what the first weeks on the tray should look like
- Division method: callus timing for divided clumps and separated offsets
FAQ
How do I know if my cutting is properly callused?A properly callused cutting has a dry, matte, firm surface. If it still looks wet or glossy, it needs more time. If it's soft or wrinkled, it may already be rotting.
Can I speed up callusing?No - suberin and lignin deposition takes time. Heat or airflow can help slightly, but rushing leads to rot. Be patient.
Do leaf propagations need callusing?No - leaf pulls callus naturally when placed on dry soil. The wound seals during the 1-2 weeks before roots appear.
Frequently Asked Questions
How do I know if my cutting is properly callused?
A properly callused cutting has a dry, matte, firm surface. If it still looks wet or glossy, it needs more time. If it's soft or wrinkled, it may already be rotting.
Can I speed up callusing?
No - suberin and lignin deposition takes time. Heat or airflow can help slightly, but rushing leads to rot. Be patient.
Do leaf propagations need callusing?
No - leaf pulls callus naturally when placed on dry soil. The wound seals during the 1-2 weeks before roots appear.
What is the first step for callusing: why cuttings need time on the counter?
A proper callus is dry, matte, and firm - not wet, glossy, or soft.