| Question | Short Answer |
|---|---|
| My leaf has shriveled but no roots - is it dead? | Not necessarily. |
| Should I mist my leaf propagation tray? | Light misting every few days helps, but the soil should not stay wet. |
| Which succulents don't propagate well from leaves? | Kalanchoe, variegated cultivars (they revert to green), and cactus. |
| What is the first step for leaf propagation: step-by-step for crassulaceae? | Let leaf dry 2-3 days on a dry surface before placing on soil - no watering for 1-2 weeks. |
Leaf propagation is the most frequently discussed method for multiplying succulents, and also the one most often botched in execution. The principle is straightforward: a detached leaf contains meristematic cells at its base that, given the right conditions, can generate both roots and a new rosette without further intervention. The catch is that "right conditions" is more specific than most guides suggest, and the single most common reason nothing appears after six weeks is a problem that happened in the first ten seconds of the process. Here is the rest of the picture.
Quick Answer
- Detach leaves cleanly by gently rocking them side-to-side - don't twist. The entire leaf base must come with the leaf.
- Let leaf dry 2-3 days on a dry surface before placing on soil - no watering for 1-2 weeks.
- Place on well-draining soil in bright indirect light. Mist lightly every few days. Roots appear in 2-4 weeks.
Part of the Beginner's Guide to Succulents.
Which Genera Take From Leaves
Not all Crassulaceae respond to leaf propagation, and the gap in success rates is wide enough to affect whether the method is worth attempting at all.
High success (60–90% under correct conditions):
- Echeveria (DC.) Lem. is the most reliable genus for leaf propagation in the family. Soft-leaved, glaucous rosette species like E. elegans E.Walther, E. derenbergii Purpus, and E. prolifica Moran & J.Meyran routinely reach 75–90% success. Firm-leaved, triangular species like E. agavoides (Lem.) Walp. come in at 60–80% for the wild-type; named dark cultivars such as 'Romeo Rubin' and 'Ebony' often fall below 30% because the meristematic zone at the leaf base is comparatively narrow.
- Graptopetalum Rose is among the most willing propagators in the family. G. paraguayense (N.E.Br.) E.Walther, the ghost plant, consistently achieves 85–90% success from leaves. The tissue at the base attaches cleanly, which makes detachment straightforward even for beginners.
- Sedum (tender, soft-leaved section): S. rubrotinctum R.T. Clausen, S. nussbaumerianum Bitter, S. adolphi Hamet, and the low rosette-forming S. pachyphyllum Rose all propagate freely from leaves, with success rates around 70–85%. The upright Hylotelephium types and the creeping mat-forming sedums do not respond to leaf propagation; those groups need division or stem fragments respectively.
- Pachyphytum Link, Klotzsch & Otto: chunky, glaucous species like P. oviferum J.A.Purpus propagate at 60–75% success. The leaves are thick and detach cleanly.
Low or unreliable success (below 20%, or effectively zero):
- Aeonium Webb & Berthel.: the geometry looks right but the biology does not cooperate. Leaf propagation of Aeonium across all species typically produces occasional root hairs but no plantlet; the meristem at the leaf base is insufficiently differentiated to regenerate a growing point. Observed success rates among collectors sit at 5–15% at best, and "success" at that rate usually means a single misshapen shoot that stalls. Division of offsets or stem cuttings from branching species are the correct methods.
- Haworthia Duval: leaves detach with apparent ease, but the success rate for generating a true plantlet is low and inconsistent, around 10–20%. Soft-leaved varieties of H. cooperi Baker perform better than hard-leaved types like H. fasciata (Willd.) Haw. Offsets are far more reliable for this genus.
- Aloe L.: rarely succeeds. The leaf base cells are not meristematically active in the way required for regeneration. Anecdotal successes are not reproducible at any useful scale.
- Woody Crassula: Crassula ovata (Mill.) Druce leaves placed on substrate usually die without rooting. Smaller-leaved, softer-stemmed species such as C. perforata Thunb. do somewhat better but inconsistently. Stem cuttings are the reliable method for this genus.
- Sempervivum L.: essentially zero success from leaf propagation. The genus propagates by stoloniferous offsets, not by leaf regeneration, and no amount of patience changes that.
What "A Clean Detachment" Means
This is where the majority of leaf propagation failures originate, and the failure is invisible until three or four weeks later when nothing appears.
The structure you need is the meristem. In a Crassulaceae leaf, the meristematic cells capable of generating a new growing point sit at the very base of the leaf, at the point where it meets the stem. If that basal tissue is left behind on the stem (from a leaf that snapped rather than twisted free), the detached leaf has no regenerative capacity at all. It will sit on substrate, look healthy for a week or two, and then slowly dry out without producing roots or a plantlet. There is nothing wrong with your substrate or your timing; the leaf was dead before it left the plant.
To detach correctly:
- Hold the stem steady with one hand.
- Grip the leaf as close to its base as possible with the other.
- Twist the leaf sideways, away from its axis of growth, rather than pulling straight out or down.
- A successful detachment leaves the base of the leaf slightly white or pale and concave, with no green remnant left on the stem. An unsuccessful one leaves a visible green wedge of tissue still attached to the stem.
Do not wiggle the leaf back and forth repeatedly. One firm, sideways rotation is enough. If the leaf feels stuck, wait rather than forcing it. The best time to take leaves is near the end of a watering cycle, when the plant is drier and the leaf bases are slightly looser than when fully turgid.
Calluse the Cut
Place detached leaves on a dry surface, not in substrate, for 3 to 7 days before doing anything else. The exposed basal tissue needs to form a dry callus before it contacts any moisture. An uncalloused leaf on damp substrate is an entry point for Fusarium and Pythium species, both of which cause the rapid blackening and collapse that beginners often attribute to the wrong substrate mix or incorrect lighting.
The right environment for callusing is indirect light and dry air. A seed tray, a paper plate, or a wire rack on a windowsill out of direct sun all work. Ambient relative humidity of 40–60% is fine. Avoid leaving leaves in a sealed container or plastic bag during this phase; trapped humidity slows callusing significantly and raises fungal risk.
Do not rush this step in an attempt to start roots earlier. Leaves that have been on the plant for a long time, such as lower rosette leaves that were yellowing before removal, still need a full callus period. Age of the leaf before detachment does not substitute for callusing time after.
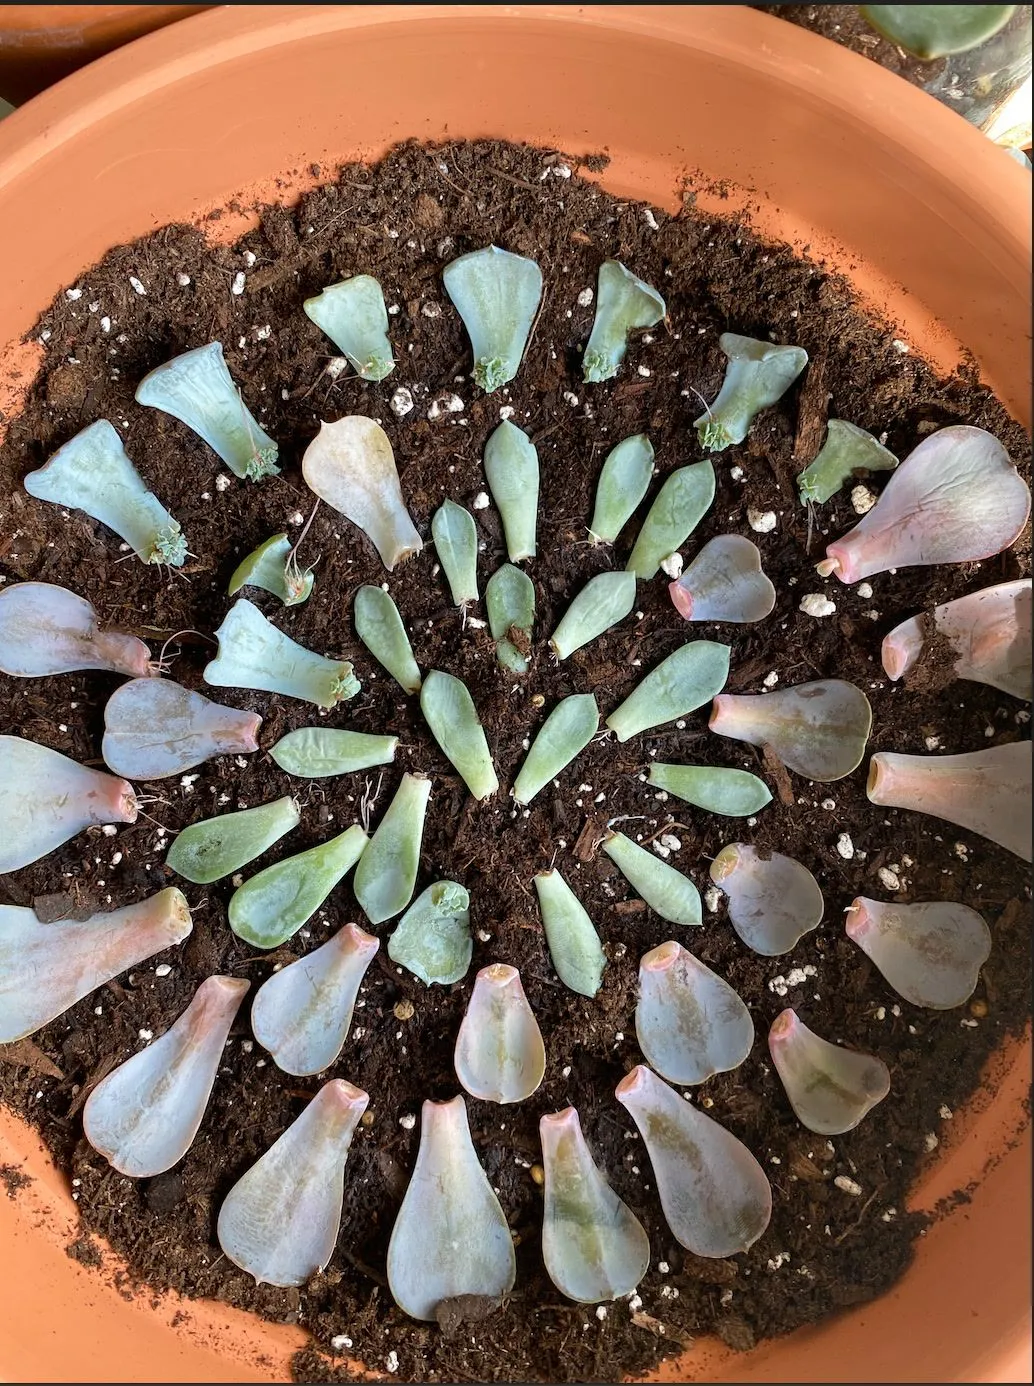
Substrate and Tray Setup
Once the cut surface is dry and sealed, arrange the leaves in a shallow tray. A practical setup is a 1 cm layer of fine pumice or perlite (2–3 mm particle size) spread evenly across the bottom. Coarser grit works but gives emerging roots less material to grip. Pure horticultural sand is a poor choice; it compacts and holds water unevenly.
Place leaves base-side down, or at a slight angle with the base touching or nearly touching the surface. The leaf body itself should not be buried. Set the tray in bright indirect light at an ambient temperature of 20–25 °C (68–77 °F). This range covers most temperate indoor environments in spring and summer and aligns with the conditions in which the native ranges of Echeveria and Graptopetalum experience their active growing season.
Mist the surface of the substrate lightly every 3 to 4 days. You are not watering the leaves; you are maintaining a thin layer of ambient moisture near the base of the tray to encourage root emergence. The mist should dampen only the top few millimetres of pumice and evaporate within an hour or two. If the substrate surface remains damp when you next go to mist it, skip that misting. In dry climates where indoor relative humidity falls below 30% RH, mist every second day instead.
Avoid placing the tray in a sealed propagator at this stage. Air circulation reduces fungal pressure. A loose layer of horticultural fleece works if indoor temperatures are inconsistent, but remove it once daytime temperature is stable above 20 °C.
What You Will See and When
The developmental sequence is consistent across genera, though timing varies by species, season, and ambient temperature.
Days 1–14: Nothing visible. The leaf may look exactly as it did when detached, or may curl slightly as it loses moisture from the tip. Both are normal. Do not water the substrate during this period.
Days 14–28: Fine, often pink or cream-coloured root hairs appear at the base of the leaf. This is your cue to begin watering, and not before. Wait until roots are at least 1–2 cm long before introducing any moisture to the substrate. Watering before roots are present serves no purpose; the leaf cannot take up water without them, and the moisture only raises rot risk.
Days 21–45: A small bud appears at the base, usually alongside the roots or slightly above them. This is the new plantlet. From this point, water the substrate more regularly, directing moisture toward the base of the leaf rather than the leaf surface itself. Misting the leaf body risks standing water in the new rosette, which can cause rot in the tiny emerging leaves.
Days 45–90: The plantlet develops its first several true leaves, and the parent leaf begins to yellow and shrink. This is normal and expected: the parent leaf is being metabolised by the plantlet. Do not remove the parent leaf while it still has any firmness or colour. Wait until it is completely desiccated and releases from the base without resistance.
The plantlet is ready for individual potting when it has 4 to 6 leaves of its own and the parent leaf has fully dried.
Failure Modes
Rot at the base (black tissue, collapse within the first two weeks): The substrate was wet before roots were present, or the callusing period was abbreviated. Once rot appears, the leaf is unrecoverable. Discard it and check the remaining tray for airflow and substrate moisture levels.
Mummification (leaf shrivels and dries without producing roots): The ambient environment was too dry for root emergence, or the leaf detachment was incomplete and the meristematic base stayed on the stem. If the leaf is still firm rather than papery, move the tray to a slightly more humid position or increase misting frequency. If the leaf has already become papery throughout, it is gone.
Roots present, no plantlet: The detachment caught the root-generating tissue but not the shoot meristem. This happens more with triangular or firm-leaved species where the two zones are close but distinct. Roots without a plantlet will grow for a while and then die as the parent leaf exhausts its reserves. Nothing can recover this particular leaf, but it tells you to take your next detachments with a firmer grip closer to the stem base.
No activity after 6 weeks: For soft-leaved genera like Echeveria and Graptopetalum, the leaf is almost certainly spent. Discard. For Pachyphytum and thicker-leaved species, allow up to 10 weeks before drawing that conclusion.
Hybrid Stability of Propagated Plantlets
Leaf-propagated plants are genetically identical to the parent, because no sexual recombination occurs. A named cultivar propagated by leaf will produce that cultivar exactly. A hybrid with particular colouration or form passes those traits to its plantlets unchanged.
The practical exception is chimeric variegation. Variegated cultivars where the colouration is maintained by the specific arrangement of tissue layers in the growing apex (most of the streaked or sectored succulents in the trade fall into this category) cannot reliably be propagated by leaf. Leaf propagation bypasses the growing apex entirely, and the resulting plantlet regenerates from a single cell lineage that may or may not carry the variegated tissue. In practice, plantlets from chimeric variegated parents frequently revert to all-green or uniformly coloured forms. For these plants, use stem cuttings or offsets if you want to preserve the pattern.
One other note: spontaneous colour variants do occasionally appear in a propagation tray, usually as a plantlet with noticeably different flush or tip colour than the parent. These are somatic mutations, not errors. Some have entered the trade as new cultivars after collectors recognised them in exactly this context.
See also
- A Beginner's Guide to Succulents: light, water, substrate, and container basics that underpin all propagation work
- The Complete Echeveria Guide: cultivation notes for the genus with the highest leaf propagation success rates
- The Complete Sedum Guide: which sedum types respond to leaves and which need division or stem cuttings
- The Complete Crassula Guide: why stem cuttings outperform leaf propagation for jade-type species
FAQ
My leaf has shriveled but no roots - is it dead?Not necessarily. Leaves often shrivel as they put energy into root formation. Wait 4-6 weeks. If it stays shriveled and turns papery, it failed.
Should I mist my leaf propagation tray?Light misting every few days helps, but the soil should not stay wet. Overwatering causes the leaf to rot before roots form.
Which succulents don't propagate well from leaves?Kalanchoe, variegated cultivars (they revert to green), and cactus. These are better propagated from cuttings or offsets.
Frequently Asked Questions
My leaf has shriveled but no roots - is it dead?
Not necessarily. Leaves often shrivel as they put energy into root formation. Wait 4-6 weeks. If it stays shriveled and turns papery, it failed.
Should I mist my leaf propagation tray?
Light misting every few days helps, but the soil should not stay wet. Overwatering causes the leaf to rot before roots form.
Which succulents don't propagate well from leaves?
Kalanchoe, variegated cultivars (they revert to green), and cactus. These are better propagated from cuttings or offsets.
What is the first step for leaf propagation: step-by-step for crassulaceae?
Let leaf dry 2-3 days on a dry surface before placing on soil - no watering for 1-2 weeks.